
Inveigh – What's New in Version 1.4
Ugh, I can’t believe it’s been a year and a half since the last release of Inveigh. I had intended to complete a new version back in March. At that time, my goals were to perform some refactoring, incorporate dynamic DNS updates, and add the ability to work with shares through NTLM challenge/response relay. In the end, the refactoring is really the only thing that went as planned. Oh well, September isn’t really all that far past March, right?
Wait, what’s an Inveigh?
If you aren’t familiar with Inveigh, here’s how I describe it on the wiki:
“Inveigh is a PowerShell LLMNR/mDNS/NBNS spoofer and man-in-the-middle tool designed to assist penetration testers/red teamers that find themselves limited to a Windows system. At its core, Inveigh is a .NET packet sniffer that listens for and responds to LLMNR/mDNS/NBNS requests while also capturing incoming NTLMv1/NTLMv2 authentication attempts over the Windows SMB service. The primary advantage of this packet sniffing method on Windows is that port conflicts with default running services are avoided. Inveigh also contains HTTP/HTTPS/Proxy listeners for capturing incoming authentication requests and performing attacks. Inveigh relies on creating multiple runspaces to load the sniffer, listeners, and control functions within a single shell and PowerShell process.”
I often hear people simply say, “Inveigh is the PowerShell version of Responder.” Which always makes mumble to myself about packet sniffing and other design differences that are probably meaningless to most. Regardless of how Inveigh is described though, if you have used Responder, Inveigh’s functionality will be easy to understand. The main difference being that where Responder is the go to tool for performing LLMNR/NBNS spoofing attacks, Inveigh is more for PowerShell based Windows post-exploitation use cases.
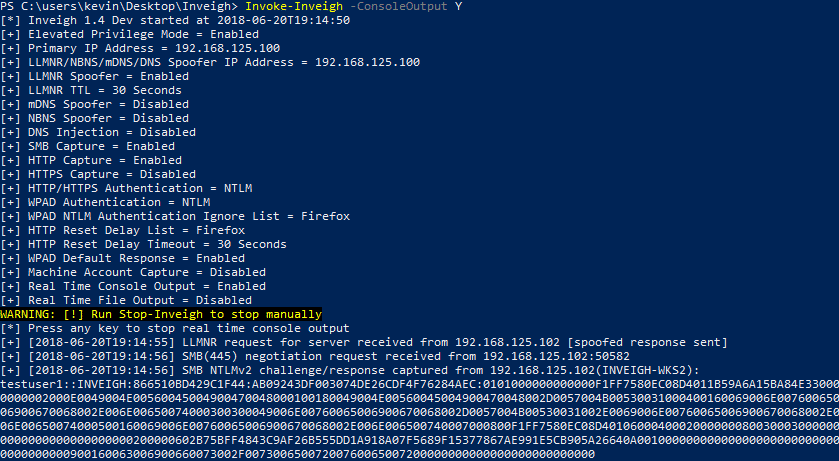
What’s new in Inveigh 1.4
In this blog post, I’ll go through the following major additions and details related to Inveigh 1.4:
- Invoke-Inveigh Additions
- ADIDNS Attacks
- Additional Detection Evasion Options
- Invoke-InveighRelay Additions
- Relay Attacks
- Multiple Target Handling
- BloodHound Integration
- ConvertTo-Inveigh
- Project Links
Invoke-Inveigh Additions
Invoke-Inveigh is the main LLMNR, mDNS, and NBNS spoofing module.
ADIDNS Attacks
For a detailed explanation of ADIDNS attack techniques, see my blog post on the subject.
Inveigh now contains the following two optional ADIDNS attacks:
- Wildcard – Inveigh will add a wildcard record to ADIDNS at startup.

- Combo – Inveigh keeps track of LLMNR/NBNS name requests. If the module sees the same request from a specified number of different systems, a matching record will be added to ADIDNS.

Inveigh’s automated approach may not always be the best way to perform ADIDNS attacks, for manual options, see my Powermad project.
Note, the ADIDNS attacks ended up replacing and extending the role I had originally planned for dynamic DNS updates. I removed the dynamic DNS update code that existed in some of the early 1.4 dev versions.
Additional Detection Evasion Options
There are lots of tools designed to detect LLMNR and/or NBNS spoofers. Last year at DerbyCon, Beau Bullock, Brian Fehrman, and Derek Banks released CredDefense. This toolkit contains a spoofer detection tool named ResponderGuard. This tool can send requests directly to a host IP address rather than the traditional multicast/broadcast addresses. This technique has the added benefit of allowing detection across subnet boundaries. Inveigh can now detect and ignore these types of requests in order to help avoid detection.
I’ve also been noticing that endpoint protection products are leveraging agents to detect LLMNR/NBNS spoofers. If you see lots of random requests originating from each workstation, this detection technique is potentially in use. The ideal evasion technique is to watch the request traffic and pick out specific, potentially safe names to spoof. However, in an attempt to automate evading this type of detection, I’ve added the option to prevent Inveigh from responding to specific name requests unless they have been seen a specified number of times and/or from a specified number of different hosts. This should help weed out the randoms at the cost of skipping less frequent legitimate requests.
Invoke-InveighRelay Additions
Invoke-InveighRelay is the HTTP, HTTPS, and Proxy to SMB relay module. I may have gotten a little carried away with the additions to this module for just a single release. The file share functionality lead to maintaining authenticated SMB sessions, which begged for more targets, which inspired target enumeration (thanks Scott!), which reminded me of BloodHound, and now it’s September.
Relay Attacks
The new version contains the following three SMB2.1 compatible attacks:
- Enumerate – The enumerate attack can perform Group, User, Share, and NetSession enumeration against a target.
- Execute – Performs PSExec style command execution. In previous versions of Inveigh Relay, this was the only available attack. Note, I removed SMB1 support.
- Session – Inveigh Relay can now establish and maintain privileged/unprivileged authenticated SMB sessions. The sessions can be accessed with Invoke-SMBClient, Invoke-SMBEnum, and Invoke-SMBExec from my Invoke-TheHash project. Inveigh Relay will attempt to keep the sessions open as long as the module is running.
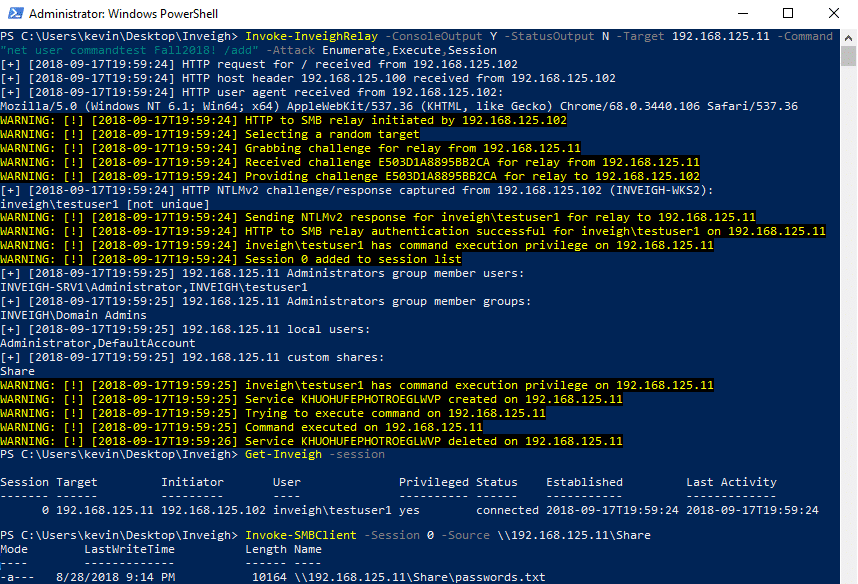
Inveigh Relay will accept any combination of the three attacks chained together.
Disclaimer, I didn’t originally design the Invoke-TheHash SMB tools with with this type of usage in mind. I will likely need to at least beef up the SMB error handling.
Multiple Target Handling
Previously, Inveigh Relay could only target a single system. With the addition of the session attack, I thought it made sense add the capability to target multiple systems without restarting the module. My initial implementation attempts focused on simply identifying valid targets and preventing things like unnecessarily performing the same source/destination relays over and over.
Later, after I created Invoke-SMBEnum for performing enumeration tasks, I started thinking that it would be useful to incorporate the enumeration code directly into Inveigh Relay. This would allow me to leverage the results, combined with incoming user session information obtained through relay, for making targeting decisions. Basically, the module would gather as much information about the environment as possible through unprivileged user relays and attempt to use that information to find relay source/target combinations that will provide privilege or access to file shares.
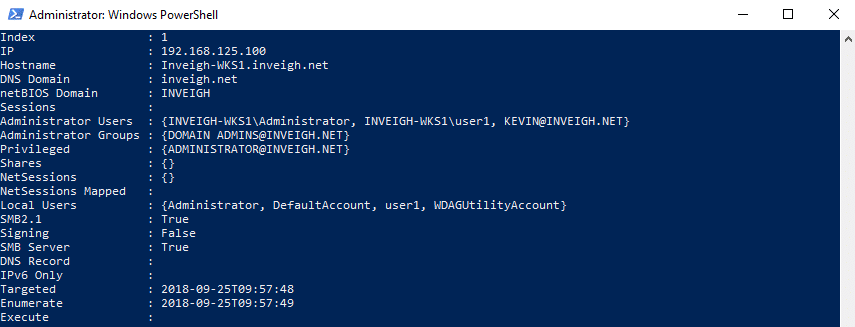
Inveigh Relay stores the following target information in memory, most of which is used for targeting decisions:
- IP – Target’s current IP address.
- Hostname – Target’s hostname.
- DNS Domain – Target’s AD domain in DNS format.
- NetBIOS Domain – Target’s AD domain in NetBIOS format.
- Sessions – Target’s identified user sessions.
- Administrators Users – Local Administrators group, user members.
- Administrators Groups – Local Administrators group, group members.
- Privileged – Users with command execution privilege on the target.
- Shares – Target’s custom share if any.
- NetSessions – Target’s NetSessions minus the NetSessions generated through the relay process.
- NetSession Mapped – User sessions discovered through enumerating NetSessions on other targets.
- Local Users – Target’s local users.
- SMB2.1 – Status of SMB2.1 support on the target.
- Signing – Status of SMB signing requirements on the target.
- SMB Server – Whether or not SMB is running and accessible on the target.
- DNS Record – Whether or not a DNS record was found if a lookup was performed.
- IPv6 Only – Whether or not the host is IPv6 only.
- Targeted – Timestamp for when the target was last targeted.
- Enumerate – Timestamp for when the target was last enumerated with the ‘Enumerate’ attack.
- Execute – Timestamp for the last time command execution was performed through the ‘Execute’ attack on the target.
One quick note regarding unprivileged system enumeration. You will likely encounter more and more systems that do not allow some forms of unprivileged enumeration. See this post from Microsoft for more details.
So far, Inveigh Relay uses the following priority list to select a target:
- Local Administrators Group (User Members) – The module will lookup previously observed user sessions attached to an incoming connection. Next, Inveigh Relay will search for matches in the target pool’s enumerated local Administrators groups.
- Local Administrators Group (Nested Group Members) – The module will lookup previously observed user sessions attached to an incoming connection. Next, Inveigh Relay will attempt to identify AD group membership for the sessions. Finally, the module will search for group matches in the target pool’s enumerated local Administrators groups. Note, Inveigh Relay alone does not have the ability to enumerate Active Directory (AD) group membership
- NetSessions – The module will get the IP address of an incoming connection. Next, Inveigh Relay will search for matches within the target pool’s NetSessions. For example, if an incoming connection originates from ‘192.168.1.100’ any system with a NetSession that contains ‘192.168.1.100’ is a potential target.
- Custom Shares – The module will target systems that host custom shares (not defaults like C$, IPC$, etc) that may be worth browsing with multiple users.
- Random – The module will optionally select a random target in the event an eligible target has not been found through the above steps. Inveigh Relay will apply logic to prioritize and exclude targets from within the random target pool.

BloodHound Integration
Once I started putting together targeting based on enumeration, I was of course reminded of the awesome BloodHound project. Since I consider Inveigh’s default state to be running from a compromised AD system, access to AD has usually already been achieved. With AD access, BloodHound can gather most of the same information as Inveigh Relay’s Enumerate attack with the bonus of having visibility into AD group membership.
When using imported BloodHound data, think of Inveigh Relay as one degree of local privilege whereas BloodHound is six degrees of domain admin. Inveigh Relay does not have full BloodHound path visibility. It is still a good idea to identify and specify relay targets which will grant the access required for the engagement goals.
Second disclaimer, I’ve mostly just tested targeting through BloodHound data in my lab environments. There are probably plenty of scenarios that can throw off the targeting, especially with large environments. I’ll continue to make adjustments to the targeting.
ConvertTo-Inveigh
ConvertTo-Inveigh is a new support function capable of importing BloodHound’s groups, computers, and sessions JSON files into memory.
Project Links
Here are links to all of the projects mentioned in this blog post:
Inveigh: https://github.com/Kevin-Robertson/Inveigh
Invoke-TheHash: https://github.com/Kevin-Robertson/Invoke-TheHash
Powermad: https://github.com/Kevin-Robertson/Powermad
BloodHound: https://github.com/BloodHoundAD/BloodHound
Responder: https://github.com/lgandx/Responder
CredDefense Toolkit: https://github.com/CredDefense/CredDefense
What’s next for Inveigh?
For this version, I need to update the wiki, perform lots of targeting tweaks, and fix bugs. After that, I’m not entirely sure. There is certainly more to explore with BloodHound integration such as exporting session information collected through Inveigh. I’d also like to revisit my original unreleased C# PoC version of Inveigh. As for today though, I’m just happy to have finally escaped my dev branch.
Questions?
If you have any questions, reach out to me @kevin_robertson on Twitter or the amazingly helpful BloodHound Gang slack. Also, feel free to say hi if you see me wandering around DerbyCon!
Explore more blog posts

Practical Methods for Decapping Chips
Discover the intricate process of chip decapping, exposing secrets stored within snuggly layers of industrial epoxy, sleeping in beds of silicon.

Hijacking Azure Machine Learning Notebooks (via Storage Accounts)
Abusing Storage Account Permissions to attack Azure Machine Learning notebooks

Celebrating NetSPI’s Partners of the Year 2024
Congratulations to NetSPI’s 2024 Partner of the Year Recipients Defy Security, VLCM, Softcat, Enduir, Evotek, and AWS
